Connect to AWS
Nullstone provisions and manages infrastructure directly in your AWS account, so it needs credentials with access to that account. Nullstone supports two authentication methods:
| Method | How it works | Best for |
|---|---|---|
| Assume Role (recommended) | You create an IAM role that trusts a dedicated Nullstone AWS account, secured with a unique External ID. Nullstone assumes the role for temporary credentials — no long-lived secrets are stored. | Almost everyone. |
| Access Keys | You create an IAM user, generate an access key, and give the key to Nullstone. | Environments where cross-account roles are not permitted. |
AWS and Nullstone both recommend Assume Role — it avoids sharing long-lived credentials and can be revoked at any time by deleting the role.
Assume Role
In the Assume Role pattern, an admin creates an IAM role in the target AWS account that grants access to a single, dedicated Nullstone AWS account (Account ID: 875119311270). This account exists only to assume roles; our engineers do not have access to it. To strengthen the trust relationship, Nullstone generates a unique External ID for each provider that must be presented when assuming the role.
When you add an AWS provider in Nullstone, the UI generates a unique role name (nullstone-<random>) and External ID for you. You can complete setup automatically with CloudFormation (recommended) or manually with the CLI or AWS console.
TIP
For background from AWS, see How to use an external ID when granting access to your AWS resources to a third party.
Automated Setup
This is the default and fastest path — it launches a CloudFormation quick-create stack that provisions the role for you.
- In the Nullstone UI, go to
Providers, clickAdd Provider, and select AWS. - Leave the authentication method set to Assume Role (the default).
- Enter your 12-digit AWS Account ID — the account you want Nullstone to manage.
- Click Connect. Nullstone opens the AWS CloudFormation Quick create stack page in a new tab, pre-filled with the generated role name, External ID, and the Nullstone account.
- Review the stack, acknowledge that it creates IAM resources, and click Create stack.
- Return to the Nullstone tab. Nullstone automatically tests the connection and completes setup as soon as the role is available.
TIP
You must be signed in to the AWS console for the target account (in the same browser) for the quick-create link to open in the correct account.
Manual Setup
Prefer to create the role yourself? Use the role name and External ID shown in the Nullstone UI for your provider (the role name looks like nullstone-<random>). Switch the dialog to Manual Setup to reveal these values, then use either the CLI or the AWS console.
CLI
WARNING
To use the CLI, your terminal must be configured with access to the target AWS account. See Installing the AWS CLI and Configuring the AWS CLI.
Create a file assume-role-policy.json, inserting the External ID generated by the Nullstone UI:
{
  "Version": "2012-10-17",
  "Statement": [
    {
      "Effect": "Allow",
      "Principal": {
        "AWS": "arn:aws:iam::875119311270:root"
      },
      "Action": "sts:AssumeRole",
      "Condition": {
        "StringEquals": {
          "sts:ExternalId": "(Insert the Nullstone-generated External ID)"
        }
      }
    }
  ]
}
Create the role using the role name from the Nullstone UI (replace nullstone-xxxxxxxx with your generated name):
aws iam create-role \
  --role-name nullstone-xxxxxxxx \
  --assume-role-policy-document file://assume-role-policy.json
Grant the role permission to provision infrastructure on your behalf:
aws iam attach-role-policy \
  --role-name nullstone-xxxxxxxx \
  --policy-arn arn:aws:iam::aws:policy/AdministratorAccess
FINISH
Return to the Nullstone UI and click Test Connection before proceeding.
AWS Console
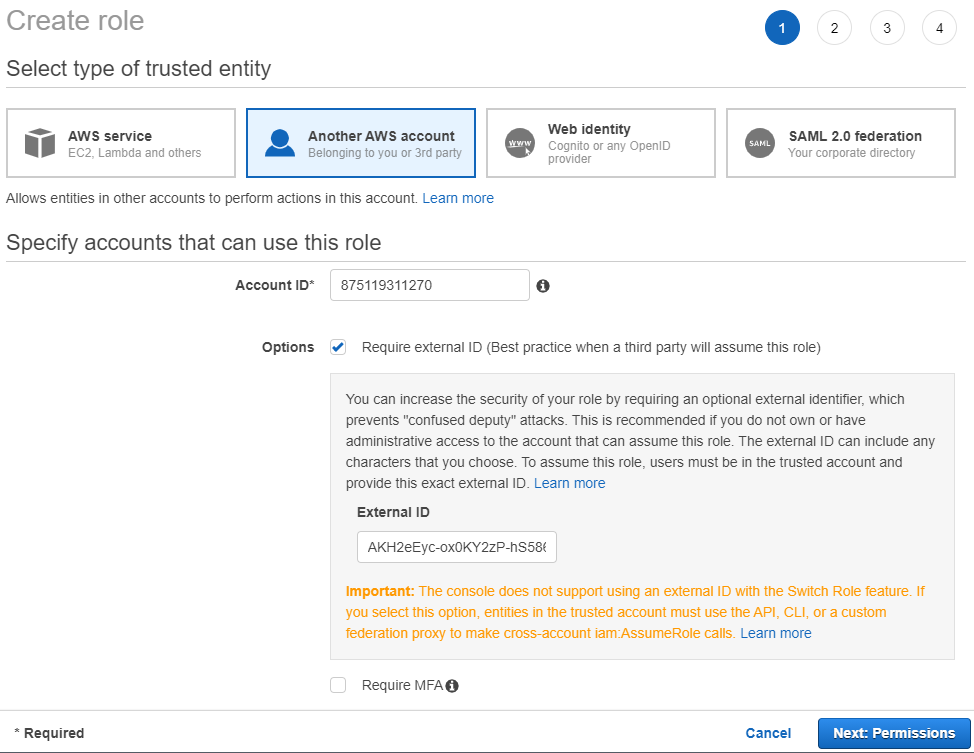
Follow this link to begin creating a role for "An AWS account": https://console.aws.amazon.com/iam/home?region=us-east-1#/roles$new?step=type&roleType=crossAccount.
Set the Account ID to 875119311270. Check Require external ID and paste the External ID from the Nullstone UI. When done, click Next.
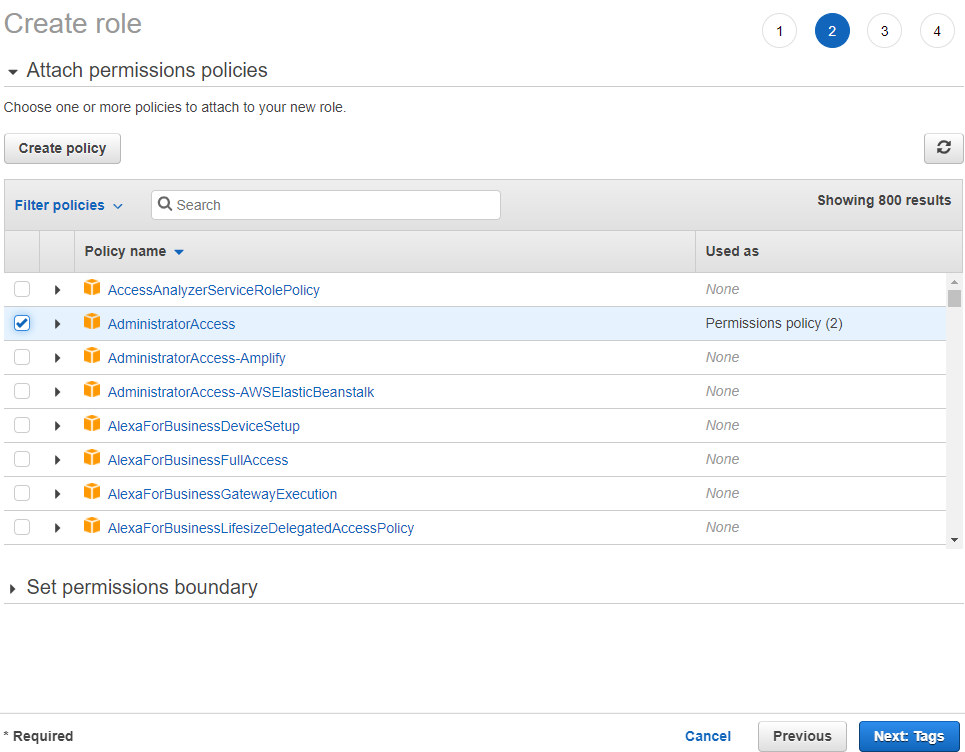
Attach the AdministratorAccess policy so the role can provision infrastructure on your behalf, then click Next.
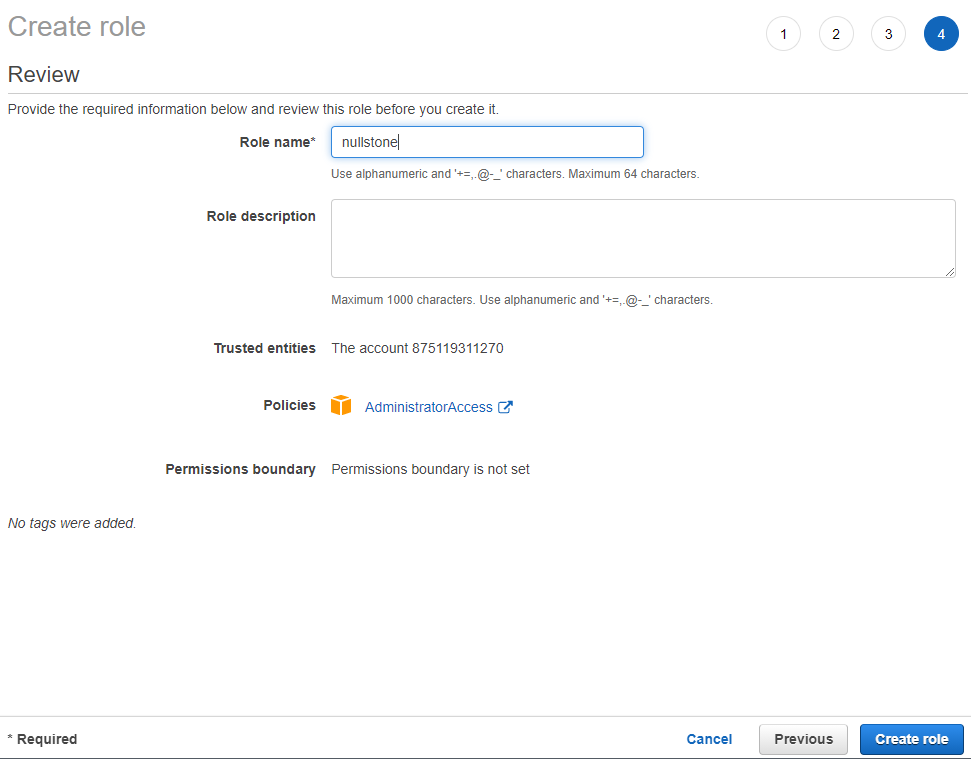
On the review screen, enter the Role name shown in the Nullstone UI (nullstone-<random>). Click Create Role to finish.
FINISH
Return to the Nullstone UI and click Test Connection before proceeding.
Access Keys
If cross-account roles are not an option, you can connect an IAM user's access key instead.
- In the AWS console, go to IAM → Users → Create user and give the user a name (for example,
nullstone). - On the permissions step, choose Attach policies directly and select AdministratorAccess so Nullstone can provision infrastructure. Finish creating the user.
- Open the new user, go to the Security credentials tab, and click Create access key. Choose Third-party service (or Application running outside AWS) as the use case.
- Copy the Access Key ID and Secret Access Key. The secret is shown only once.
- In the Nullstone UI, add an AWS provider, switch the authentication method to Access Keys, and enter the Access Key ID and Secret Access Key.
- Click Test Connection to verify access.
WARNING
Access keys are long-lived credentials. Rotate them periodically, and remove the IAM user to revoke Nullstone's access.
Cost Provider
Nullstone can display cloud spend for a connected AWS account. Cost data is retrieved from the AWS Cost Explorer API using the same credentials you configured above (the assume-role or access-key provider) — there is no separate credential to manage.
Requirements
Enable Cost Explorer in the AWS account. An account admin can enable it once from the AWS Billing and Cost Management → Cost Explorer console. It can take up to 24 hours for AWS to populate cost data after enabling.
Grant
ce:GetCostAndUsageto the connected role or user. This is the only Cost Explorer action Nullstone calls. If you attached AdministratorAccess during setup (above), this permission is already included. If you scoped the provider to a custom policy, add:json{ "Version": "2012-10-17", "Statement": [ { "Effect": "Allow", "Action": "ce:GetCostAndUsage", "Resource": "*" } ] }Alternatively, attach the AWS managed policy
AWSBillingReadOnlyAccess, which includes Cost Explorer read access.
Add the cost provider
- In the Nullstone UI, go to
Cloud Accountsand open the Cost tab. - Click Add Cost Provider.
- Choose the AWS account you already connected as a provider, then confirm.
- Nullstone runs an access test. When it passes, the account is marked Configured and cost data begins to appear.
If the access test fails, confirm that Cost Explorer is enabled and that the connected role or user has ce:GetCostAndUsage.
Included (linked) accounts
If the account you connect is the management (payer) account of an AWS Organization with consolidated billing, Cost Explorer returns spend for every member account under it. When Nullstone tests cost access, it discovers these linked accounts automatically and lists them as included accounts on the cost provider. To capture organization-wide spend, connect the payer account as your cost provider — you do not need to add each member account separately.
WARNING
The current (open) invoice month is an estimate — AWS revises it until the invoice finalizes. From Cost Explorer, Nullstone reports Billed cost (net unblended) and Usage cost (net amortized); the blended view in the AWS console will differ from these figures.
Higher fidelity: AWS Data Export (FOCUS 1.2)
Cost Explorer reports what you were billed and what you consumed, but it has no list price, so Nullstone cannot show what reservations, savings plans, or negotiated rates saved you. An AWS Data Export in the FOCUS 1.2 format fills that gap: it adds list cost, contracted cost, and resource-level detail for every month it covers.
How it works:
- You create the export in your management (payer) account. AWS delivers it to an S3 bucket you own and refreshes it at least daily.
- You grant the role or user connected to Nullstone read access to the export.
- You paste the export's S3 path onto the cost provider in Nullstone. The nightly ingestion reads the export for every month it has delivered. Months from before the export existed keep coming from Cost Explorer, and Cost Explorer's monthly total remains the figure every month is reconciled against.
Prerequisites
- Keep Cost Explorer enabled with
ce:GetCostAndUsagegranted as above. The export adds to it; it does not replace it. - Whether you use CloudFormation or the CLI, you need credentials for the payer account that can create Data Exports (
bcm-data-exports:CreateExport,cur:PutReportDefinition), manage the S3 bucket, and attach a policy to the connected role. - Activate the
Stack,Env, andBlockcost allocation tags (Billing → Cost allocation tags) if you have not already. The export carries the same activated tags Cost Explorer uses.
You can complete setup automatically with CloudFormation (recommended) or manually with the CLI.
Automated Setup
This launches a CloudFormation quick-create stack that provisions everything: the S3 bucket, the FOCUS 1.2 export delivered to it, and read access for the connected role.
- In the Nullstone UI, go to
Cloud Accounts, open the Cost tab, and click Add Cost Provider. - Choose the payer account. Under Data Export, click Create export with CloudFormation. Nullstone opens the AWS CloudFormation Quick create stack page in a new tab, pre-filled with the bucket name (
nullstone-cost-export-<account-id>), the export name (nullstone-focus), and the provider's role, and fills the Data Export Path in for you. - Review the stack, acknowledge that it creates IAM resources, and click Create stack. The stack must be created in us-east-1, where AWS Data Exports is served; the quick-create link already selects it.
- Return to the Nullstone tab and click Add Cost Provider. Cost Explorer serves the account until the export delivers its first files (up to 24 hours); after that, open the cost provider and Test Connection to confirm the export, and the Source column shows Data Export.
TIP
You must be signed in to the AWS console for the payer account (in the same browser) for the quick-create link to open in the correct account. If the provider uses access keys rather than an assumed role, the stack skips the read policy: attach the policy from step 3 of the manual setup to that IAM user yourself.
The template is nullstone-cost-export.yaml. To create the same stack from the CLI instead of the console:
curl -fsSL https://docs.nullstone.io/cloudformation/nullstone-cost-export.yaml -o nullstone-cost-export.yaml
aws cloudformation deploy --region us-east-1 --stack-name nullstone-cost-export \
  --template-file nullstone-cost-export.yaml --capabilities CAPABILITY_IAM \
  --parameter-overrides RoleName=${NULLSTONE_ROLE}
The bucket is named <BucketPrefix>-<account-id> (prefix defaults to nullstone-cost-export); the stack's DataExportPath output is the path to enter in Nullstone.
Manual Setup
Prefer to create the resources yourself? Set the variables used throughout:
export PAYER_ACCOUNT_ID=...            # the management (payer) account
export BUCKET=...                      # S3 bucket that receives the export (created below if it does not exist)
export BUCKET_REGION=us-east-1
export PREFIX=nullstone                # prefix inside the bucket
export EXPORT_NAME=nullstone-focus     # name of the export; also the last segment of the path you give Nullstone
export NULLSTONE_ROLE=nullstone        # the IAM role (or user) connected to Nullstone as your AWS provider
1. Create the bucket and let Data Exports deliver to it
aws s3api create-bucket --bucket "${BUCKET}" --region "${BUCKET_REGION}" \
  $( [ "${BUCKET_REGION}" != "us-east-1" ] && echo "--create-bucket-configuration LocationConstraint=${BUCKET_REGION}" )

cat > bucket-policy.json <<EOF
{
  "Version": "2012-10-17",
  "Statement": [
    {
      "Effect": "Allow",
      "Principal": { "Service": "bcm-data-exports.amazonaws.com" },
      "Action": ["s3:PutObject", "s3:GetBucketPolicy"],
      "Resource": ["arn:aws:s3:::${BUCKET}", "arn:aws:s3:::${BUCKET}/*"],
      "Condition": {
        "StringLike": {
          "aws:SourceAccount": "${PAYER_ACCOUNT_ID}",
          "aws:SourceArn": "arn:aws:bcm-data-exports:us-east-1:${PAYER_ACCOUNT_ID}:export/*"
        }
      }
    }
  ]
}
EOF
aws s3api put-bucket-policy --bucket "${BUCKET}" --policy file://bucket-policy.json
2. Create the export
The export must be FOCUS 1.2, daily, delivered as gzip/csv with overwrite enabled. The query selects the columns Nullstone reads; adding columns is fine, removing them is not.
cat > export.json <<EOF
{
  "Name": "${EXPORT_NAME}",
  "DataQuery": {
    "QueryStatement": "SELECT BilledCost, BillingCurrency, ChargeCategory, ChargeClass, ChargeDescription, ChargePeriodStart, ChargePeriodEnd, ContractedCost, EffectiveCost, ListCost, PricingCategory, RegionId, ResourceId, ResourceType, ServiceCategory, ServiceName, SubAccountId, SubAccountName, Tags FROM FOCUS_1_2_AWS",
    "TableConfigurations": { "FOCUS_1_2_AWS": { "TIME_GRANULARITY": "DAILY" } }
  },
  "DestinationConfigurations": {
    "S3Destination": {
      "S3Bucket": "${BUCKET}",
      "S3Prefix": "${PREFIX}",
      "S3Region": "${BUCKET_REGION}",
      "S3OutputConfigurations": {
        "OutputType": "CUSTOM",
        "Format": "TEXT_OR_CSV",
        "Compression": "GZIP",
        "Overwrite": "OVERWRITE_REPORT"
      }
    }
  },
  "RefreshCadence": { "Frequency": "SYNCHRONOUS" }
}
EOF
aws bcm-data-exports create-export --region us-east-1 --export file://export.json
AWS delivers the first files within 24 hours to s3://${BUCKET}/${PREFIX}/${EXPORT_NAME}/.
3. Let the connected role read the export
Attach a read-only policy scoped to the export prefix to the role or user you connected as the provider:
cat > nullstone-data-export-read.json <<EOF
{
  "Version": "2012-10-17",
  "Statement": [
    { "Effect": "Allow", "Action": "s3:GetBucketLocation", "Resource": "arn:aws:s3:::${BUCKET}" },
    {
      "Effect": "Allow",
      "Action": "s3:ListBucket",
      "Resource": "arn:aws:s3:::${BUCKET}",
      "Condition": { "StringLike": { "s3:prefix": "${PREFIX}/${EXPORT_NAME}/*" } }
    },
    { "Effect": "Allow", "Action": "s3:GetObject", "Resource": "arn:aws:s3:::${BUCKET}/${PREFIX}/${EXPORT_NAME}/*" }
  ]
}
EOF
aws iam put-role-policy --role-name "${NULLSTONE_ROLE}" \
  --policy-name nullstone-data-export-read \
  --policy-document file://nullstone-data-export-read.json
(For an access-key provider, use aws iam put-user-policy --user-name ... instead.)
4. Point the cost provider at the export
- In the Nullstone UI, go to
Cloud Accounts, open the Cost tab, and click Add Cost Provider. - Choose the payer account and enter the Data Export Path:
s3://${BUCKET}/${PREFIX}/${EXPORT_NAME}. - Click Test Connection. Nullstone checks Cost Explorer as before, then locates the bucket, lists the billing months the export has delivered, and confirms the newest one is a FOCUS 1.2 export in gzip/csv format. The Source column on the Cost tab shows Data Export once it passes.
If the test reports that nothing has been delivered yet, wait for the first delivery (up to 24 hours) and test again. If it reports the wrong table or format, recreate the export with the settings above; table and format cannot be changed on an existing export.
History starts when the export is created
An export contains no months from before it existed. Nullstone fills those months from Cost Explorer, so nothing is missing, but list and contracted cost are only available from the first exported month onward. AWS Support can backfill up to 36 months of history into an export on request from the payer account; once the files land, refresh those months from the cost view in Nullstone.
Do not turn off Cost Explorer
Cost Explorer still serves the months the export does not cover, and its monthly total is what each exported month is reconciled against. Leave it enabled and keep ce:GetCostAndUsage granted.
Service names differ slightly between the two sources (Cost Explorer says "Amazon Elastic Compute Cloud - Compute", the export says "Amazon Elastic Compute Cloud"), so a per-service breakdown can show a rename at the month the source changes.